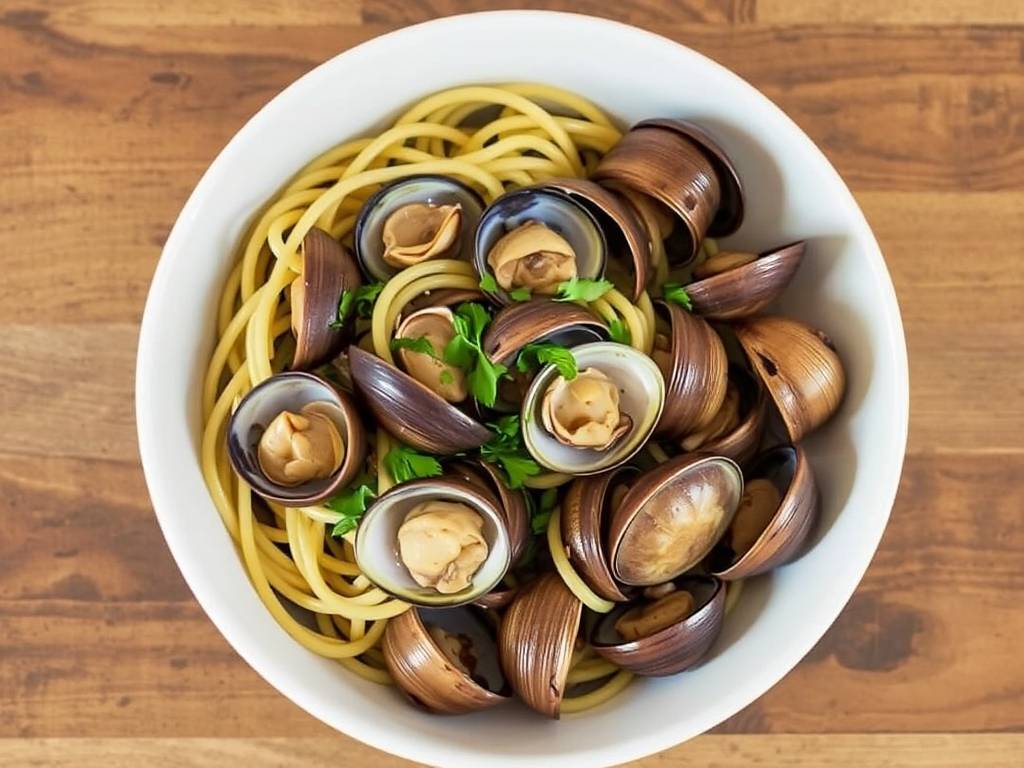
The Ultimate Guide to Cooking Restaurant-Quality Squid Ink Pasta with Shrimp at Home
There's something truly magical about squid ink pasta. Its dramatic, jet-black strands swirling on a plate create an immediate "wow" factor that promises a unique culinary adventure. When paired with plump, succulent shrimp, it transforms into a dish that feels both luxurious and incredibly satisfying. If you've ever been intrigued by this stunning pasta but felt intimidated to make it yourself, worry no more. This comprehensive guide will walk you through every single step, demystifying the process and empowering you to create a spectacular seafood pasta dish that will rival your favorite Italian restaurant's version.
Let's start by addressing the elephant in the room: the squid ink. What exactly is it, and what does it taste like? Squid ink, or nero di seppia, is a natural dye released by cephalopods like squid and cuttlefish as a defense mechanism. Far from being just a colorant, it imparts a deep, savory, and subtly briny flavor that is often described as the essence of the sea. It doesn't taste "fishy" in a overpowering way; instead, it adds a complex umami depth that beautifully complements seafood, especially shrimp.

Gathering Your Ingredients: The Foundation of Flavor
The secret to an unforgettable squid ink pasta with shrimp lies in the quality of your ingredients. Since the dish is relatively simple, each component needs to shine.
- The Pasta: You have two excellent options here. The first is to buy fresh or dried tagliolini neri or spaghetti neri—pasta that already has squid ink incorporated into the dough. This is the most convenient choice. The second, for the more adventurous cook, is to purchase squid ink sachets and mix them into your homemade pasta dough. This allows you to control the intensity of the flavor and color.
- Long-tail keyword: where to buy authentic squid ink pasta online
- The Shrimp: Opt for large, wild-caught shrimp (prawns) for the best texture and sweetness. I highly recommend using shrimp with the shells on. Why? Because we are going to use those shells to create an incredibly flavorful shrimp stock that will form the base of our sauce. This is a professional chef's secret you can easily use at home.
- Long-tail keyword: how to peel and devein shrimp properly for pasta
- The Aromatics: Fresh garlic is non-negotiable. We'll use thin slices that will infuse the oil and also get slightly crispy. A small, finely chopped shallot will add a subtle, sweet onion note. Fresh flat-leaf parsley is essential for a burst of freshness at the end.
- The Liquids: A good dry white wine (like a Sauvignon Blanc or Pinot Grigio) will deglaze the pan and add acidity. You'll also need a simple seafood or fish stock, or even the water you use to cook the pasta.
- The Finishing Toucks: High-quality extra virgin olive oil, a pinch of chili flakes for a hint of heat (optional), sea salt, freshly cracked black pepper, and a squeeze of fresh lemon juice are all you need to tie everything together.
Step-by-Step Cooking Instructions: Your Path to Perfection
Now, let's get cooking. Follow these steps in order for a seamless and stress-free experience.
Step 1: The Power of the Shell (Making Shrimp Stock) This is the step that will elevate your dish from good to extraordinary. Peel and devein your shrimp, but SAVE THE SHELLS. In a small saucepan, heat a tablespoon of olive oil over medium heat. Add the shrimp shells and sauté for 3-4 minutes, crushing them with a spoon to release their oils. They will become fragrant and turn a bright orange-pink color. Add about 1.5 cups of water or store-bought fish stock, bring to a simmer, and let it cook for 15 minutes. Strain this beautiful, orange-hued liquid through a fine-mesh sieve, pressing on the shells to extract all the flavor. Discard the shells. You now have a homemade shrimp stock that is pure gold.
")
Step 2: Prep is Key While your stock is simmering, pat your shrimp dry and season them lightly with salt and pepper. Thinly slice your garlic cloves and chop your parsley. Having everything ready (mise en place) makes the actual cooking process fast and fluid.
Step 3: Cooking the Pasta Bring a large pot of generously salted water to a rolling boil. The water should taste like the sea—this is your only chance to season the pasta itself. Cook your squid ink pasta according to the package directions, but aim for al dente (firm to the bite). It will continue to cook slightly in the sauce later. Just before draining, reserve about 1 cup of the starchy pasta water. This liquid is a magical thickener for your sauce.
Step 4: Building the Sauce & Cooking the Shrimp This is where the magic happens, and it goes quickly!
- In a large skillet or pan wide enough to hold the pasta later, heat 3 tablespoons of olive oil over medium heat.
- Add the sliced garlic and a pinch of chili flakes (if using). Sauté for just 30-60 seconds until the garlic is fragrant but not browned.
- Increase the heat to medium-high and add your shrimp in a single layer. Cook for about 1-2 minutes per side, until they are just pink and opaque. Do not overcrowd the pan, or they will steam instead of sear. Remove the shrimp from the pan and set them aside.
- Long-tail keyword: how to cook shrimp so they are tender and not rubbery
Step 5: The Grand Finale: Bringing It All Together
- With the skillet still on medium-high heat, pour in the white wine. Use a wooden spoon to scrape up all the delicious browned bits (the fond) from the bottom of the pan. Let the wine reduce by half.
- Pour in your precious homemade shrimp stock and let it simmer for 2-3 minutes to reduce slightly.
- Now, add your drained al dente squid ink pasta directly to the skillet. Toss it gently in the sauce.
- Add a splash of the reserved pasta water. The starch in the water will emulsify with the oil and stock, creating a silky, glossy sauce that clings to every strand of pasta. You may not need the full cup—add it gradually until the sauce reaches your desired consistency.
- Return the cooked shrimp to the pan, along with most of your chopped parsley. Toss everything together gently to warm the shrimp through.
- Finish with a final drizzle of extra virgin olive oil and a generous squeeze of fresh lemon juice. The lemon is crucial—it brightens all the rich, savory flavors.
Serving and Presentation
Serve immediately in warm bowls. Garnish with the remaining fresh parsley and an extra crack of black pepper. The stark contrast of the black pasta, pink shrimp, and green parsley is visually stunning. A simple side salad of arugula with a lemon vinaigrette is the perfect accompaniment to balance the meal.
Troubleshooting and FAQs
- My sauce is too watery? Let it simmer for another minute or two to reduce further. You can also add a little more pasta water and toss vigorously; the extra starch can help thicken it.
- My sauce is too thick? Simply add a bit more of your reserved pasta water, one tablespoon at a time, until it loosens up.
- Can I add other seafood? Absolutely! Scallops, clams, or mussels would be fantastic additions. Just adjust cooking times accordingly.
- The pasta stained my pot! Don't panic. Squid ink pasta can stain plastic and porous materials. Use a stainless steel or enameled pot and clean it promptly with soap and warm water. A little baking soda can also help with cleanup.
Cooking squid ink pasta with shrimp is an enjoyable process that rewards you with a dish of incredible depth and elegance. By taking the extra step to make a quick shrimp stock, you build layers of flavor that make all the difference. So, embrace the adventure, don your apron, and get ready to impress yourself and your guests with this breathtaking taste of the sea. Buon appetito
发表评论