The Ultimate Guide to Crafting Perfect Salmon Sushi Maki Rolls at Home

Have you ever watched a sushi chef effortlessly roll a perfect maki and thought, "I could never do that"? I'm here to tell you that you absolutely can. Making salmon sushi rolls at home is not only possible; it's a deeply rewarding and fun culinary adventure. Forget the high prices and the wait for a table. With a little guidance, your kitchen can become your favorite sushi spot.
This comprehensive guide is designed to walk you through every single step, from selecting the freshest ingredients to mastering the final roll. We'll tackle common hurdles like cooking the perfect sushi rice, handling nori, and achieving that iconic tight roll. By the end of this, you'll be equipped with all the knowledge and confidence needed to create beautiful, delicious, and authentic-tasting homemade salmon sushi maki.
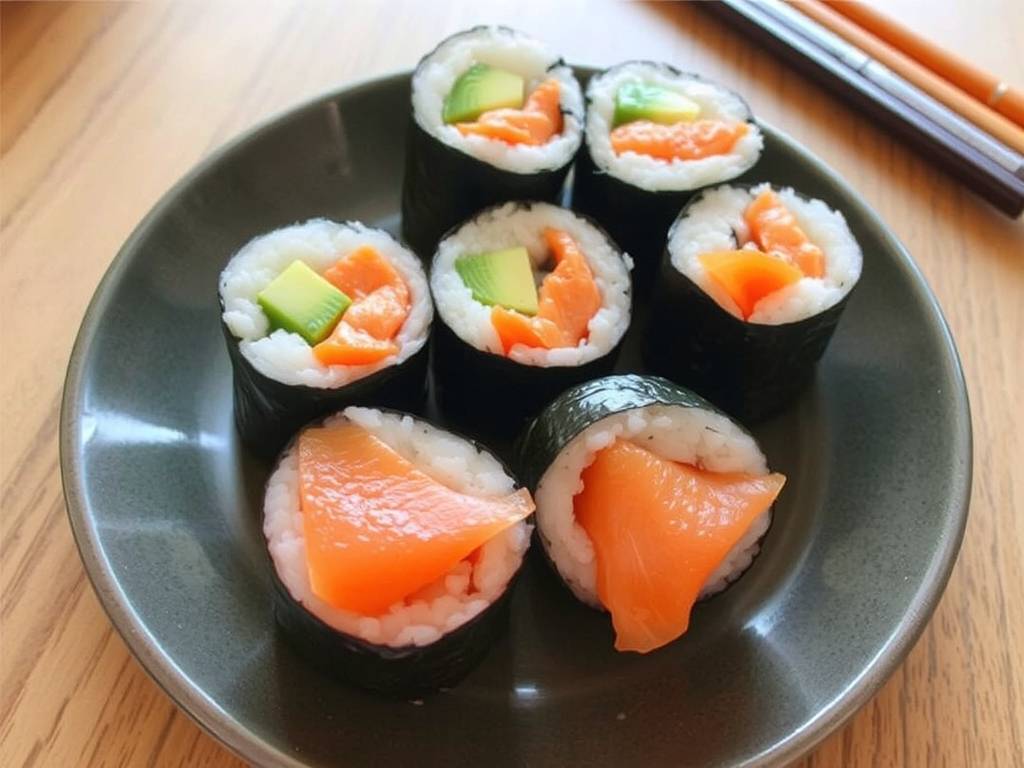
Gathering Your Sushi-Grade Ingredients and Tools
First things first, quality is paramount, especially with the star of our show: the salmon. You cannot use just any piece of salmon from the seafood counter. You must look for sushi-grade salmon for maki rolls. This term isn't regulated by the FDA, but it's used by reputable fishmongers to indicate fish that has been frozen to a specific temperature to eliminate parasites, making it safe for raw consumption. Always buy from a trusted source—your health is worth it.
Here’s your complete shopping list for classic salmon maki:
- Salmon: Look for vibrant, firm, and bright orange-red flesh with a fresh, ocean-like smell.
- Short-Grain Japanese Rice: Do not substitute with long-grain or jasmine rice. The sticky texture of short-grain rice is essential for easy salmon maki rolling.
- Nori Sheets: These are the sheets of dried seaweed. You'll find them in packs at any Asian grocery store.
- Rice Vinegar, Sugar, and Salt: For seasoning the rice.
- Fillings: Cucumber, avocado, and cream cheese are classic choices. You can also experiment with scallions or asparagus.
- Optional Garnishes: Soy sauce (or tamari), pickled ginger, and wasabi.
Now, for the tools. You don't need a fully stocked professional kitchen, but a few key items are non-negotiable:
- A Bamboo Sushi Mat (Makisu): This is the secret weapon for tightly rolled salmon maki. It provides the even pressure needed for a perfect roll.
- A Very Sharp Knife: A dull knife will crush and tear your beautiful roll. A sharp, wet knife is the key to clean cuts.
- A Wooden or Plastic Rice Paddle (Shamoji): Wood or plastic is gentler on the rice than metal.
- A Large Bowl: For cooling and mixing your rice.
The Foundation: Mastering Perfect Sushi Rice
The rice is the soul of your sushi roll. Getting it right is 80% of the battle. Many beginners guide to salmon sushi overlook this step, but perfect rice is what makes your roll hold together and taste authentic.
- Rinse and Soak: Measure out your rice and place it in a bowl. Cover it with cold water and gently swish it around. The water will become cloudy. Drain and repeat 3-4 times until the water runs almost clear. This removes excess starch and prevents gummy rice. Let the rinsed rice soak in fresh water for 30 minutes before cooking.
- Cook: Cook the rice according to your rice cooker's instructions or on the stovetop with a 1:1.1 rice-to-water ratio. Let it steam for 10-15 minutes after cooking.
- Season While Hot: This is crucial. While the rice is cooking, gently heat the rice vinegar, sugar, and salt in a small saucepan until dissolved. Do not boil. Transfer the hot, steamed rice to a large, non-metallic bowl (wooden is traditional). Slowly drizzle the vinegar mixture over the rice while using the paddle to "slice" through the rice in a cutting motion, fanning the rice simultaneously to help it cool and become glossy. The goal is to coat every grain without mashing it. Your rice should be slightly warm, not hot, when you assemble your rolls.
Preparation is Key: Prepping Your Fillings
While your rice is cooling, prepare your other components. This step-by-step salmon maki preparation ensures a smooth, stress-free rolling process.
- Salmon: Take your sushi-grade salmon and slice it into long, thin strips, about half an inch thick. Ensure they are long enough to run the length of your nori sheet.
- Vegetables: Cut the cucumber and avocado into matchstick-sized strips. If using avocado, a squeeze of lemon juice can prevent browning.
- Cream Cheese: Cut into similar long, thin strips.
- Set Up Your Station: Have your bamboo mat ready, a small bowl of water with a splash of rice vinegar (for wetting your fingers), and all your fillings within easy reach.
The Main Event: The Art of the Roll
This is the moment of truth. Don't be nervous! Follow these steps for easy salmon maki rolling techniques.
- Position the Nori: Place a sheet of nori on your bamboo mat, shiny side down. The lines on the nori should run horizontally, parallel to the edge of the mat closest to you.
- Spread the Rice: With wet hands, take a handful of rice (about a cup) and gently spread it over the nori, leaving a 1-inch border at the top farthest from you. Press the rice down evenly, but don't compact it. A thin, even layer is what you're after.
- Add Fillings: About one-third of the way up from the bottom edge, create a horizontal line of your fillings. A classic combination is salmon, cucumber, and avocado. Don't overstuff! This is the most common mistake. Less is more for a tightly rolled salmon maki.
- The Lift and Tuck: Using your thumbs, lift the edge of the mat closest to you. Fold the nori and rice over the fillings, using the mat to press them in slightly. This is the "tuck." Ensure the bottom edge of the nori meets the rice to start the cylinder.
- Roll and Press: Continue rolling forward, using the mat to apply gentle, even pressure along the length of the roll. Don't squeeze too hard. Once you reach the bare nori at the top, moisten it with a little water and complete the roll to seal it.
- Shape: Give the completed roll a few gentle, final squeezes along its entire length with the mat to create a neat, round cylinder.
The Final Touch: Slicing and Serving
Your roll is made, but slicing it poorly can undo all your hard work. Here’s how to get those perfect, clean slices:
- Use a Sharp, Wet Knife: Seriously, this cannot be overstated. Wipe the blade with a damp cloth between each cut.
- Find the Center: Cut the roll in half straight down the middle.
- Line Up the Halves: Place the two halves side-by-side.
- Cut into Six or Eight Pieces: Cut each half into three or four equal pieces. A swift, gentle sawing motion works best.
Arrange your beautiful homemade salmon sushi maki on a plate. Serve immediately with soy sauce, a dab of wasabi, and some pickled ginger to cleanse the palate.
Troubleshooting and Pro Tips for the Best Salmon Sushi Rolls
- My roll is falling apart: This is usually due to too much filling, not enough rice pressure during rolling, or rice that was too dry or over-rinsed.
- The nori is tearing: You may be rolling too tightly, or the nori might be old and stale. Ensure your rice is spread evenly to support the nori.
- The rice is mushy: You likely overcooked the rice or didn't rinse the starch off sufficiently.
- Experiment! Once you've mastered the classic roll, try an inside-out roll (uramaki), where the rice is on the outside. You can also add toppings like sesame seeds or tobiko (flying fish roe) for extra texture and flavor. This is your journey into creative salmon and avocado roll variations.
Making sushi is a skill, and like any skill, it improves with practice. Your first roll might not be restaurant-perfect, but it will be delicious—a creation of your own hands. So gather your ingredients, embrace the process, and discover the immense joy of creating your own best salmon sushi rolls right at home. Happy rolling


发表评论