The Ultimate Guide to Grilling Perfect Lobster Tails with Lemon and Parsley
There's something truly magical about grilling lobster tails. The sweet, tender meat, kissed by smoky flames and brightened with zesty lemon and fresh parsley, creates a dining experience that feels both luxurious and wonderfully approachable. If you've ever felt intimidated by the thought of preparing lobster at home, let me assure you – grilling lobster tails is far easier than you might imagine. This comprehensive guide will walk you through every step, from selecting your lobster tails to presenting a stunning platter that will have everyone reaching for their phones to take pictures.
Why Grill Lobster Tails?

Before we dive into the "how," let's talk about the "why." Grilling isn't just a cooking method; it's a flavor transformer. The high, direct heat of the grill caramelizes the natural sugars in the lobster meat, creating a delightful smoky sweetness that boiling or steaming simply can't match. The slight char from the grill grates adds a textural contrast to the incredibly tender interior. When you pair this with a simple, vibrant mixture of lemon and parsley, you elevate the lobster to new heights without masking its delicate, natural flavor.
Selecting the Best Lobster Tails for Grilling
Your journey to a perfect grilled lobster dinner begins at the market. You'll typically find two main types: cold-water and warm-water lobster tails. Cold-water tails, like those from Maine or Canada, are generally considered superior for their sweeter, more tender meat. They have a thicker shell and more meat relative to their size. Warm-water tails, often from places like Florida or the Caribbean, are still delicious but can be slightly chewier.
When selecting, look for tails that are firm to the touch, with shells that are intact and have a vibrant, dark greenish-brown color. The meat should be opaque and smell fresh and clean, like the ocean – never fishy. Frozen lobster tails are an excellent and often more affordable option. Just be sure to thaw them slowly and completely in the refrigerator for 24 hours before grilling. Rushing the thawing process with warm water will compromise the texture of the meat.
Essential Tools and Ingredients
You don't need a professional kitchen to pull this off. Here’s your simple checklist:
- Lobster Tails: Plan on one 6 to 8-ounce tail per person.
- Olive Oil: A good quality extra virgin olive oil for basting and flavor.
- Fresh Lemons: You'll need both juice and zest.
- Fresh Parsley: Flat-leaf (Italian) parsley is preferred for its more robust flavor.
- Garlic: Freshly minced garlic adds a wonderful aromatic base.
- Salt and Pepper: Kosher salt and freshly cracked black pepper.
- Kitchen Shears: The most important tool for butterflying the tails.
- Basting Brush: For applying the lemon and parsley butter.
- Tongs: For safely handling the tails on the grill.
- Instant-Read Thermometer: The ultimate tool for guaranteeing perfectly cooked lobster.
The Art of Preparing Lobster Tails for the Grill
Proper preparation is the secret to flawless execution. The goal is to butterfly the tails, which not only creates a beautiful presentation but also allows for even cooking and provides a "pocket" for your flavorful butter to pool in.
- Rinse and Dry: Start by rinsing your thawed lobster tails under cold water and patting them completely dry with paper towels.
- Butterfly the Tail: With the tail shell-side down, use your kitchen shears to cut straight down the middle of the top of the shell, from the open end all the way to the base of the tail fin. Be careful not to cut through the bottom shell. A great tip is to flip the tail over and use the shears to snip the thin membrane on the underside. This helps the tail lie flat and prevents it from curling on the grill.
- Crack the Shell: Gently pry the shell open with your fingers, loosening the meat.
- Lift the Meat: Carefully lift the meat through the slit you created, pulling it up and resting it on top of the split shell. It should look like a butterfly with its wings open. Leave the very end of the meat attached to the tail fin to keep everything together.
- Score the Meat: Make a shallow cut down the center of the exposed meat. This small step is a pro-move that prevents the meat from curling as it cooks and allows the heat to penetrate more evenly.
Creating the Flavor Powerhouse: Lemon Parsley Butter
While the lobster itself is the star, the lemon parsley butter is the supporting actor that deserves an Oscar. This simple compound butter is what will make your dish unforgettable.
In a small bowl, combine 4 tablespoons of melted unsalted butter, the zest of one lemon, two tablespoons of freshly squeezed lemon juice, a quarter cup of finely chopped fresh parsley, one minced garlic clove, half a teaspoon of kosher salt, and a quarter teaspoon of black pepper. Whisk it all together. The aroma alone will tell you you're on the right track. This mixture is your basting gold.
Mastering the Grill: Step-by-Step Cooking Instructions
Now for the main event. Fire up your grill to medium-high heat (around 375-400°F or 190-200°C). You want a good, hot surface to get those beautiful grill marks and a quick sear.
- Oil and Season: Brush the exposed lobster meat lightly with olive oil and sprinkle with a little extra salt and pepper.
- Grill, Meat-Side Down First: Place the tails on the hot grill, meat-side down. Grill for 2-3 minutes, until you have nice grill marks and the meat has turned opaque on the surface. This initial sear locks in the juices.
- Flip and Baste: Carefully flip the tails so they are shell-side down. The shell will act as a little boat, protecting the meat from direct flame and holding in all the delicious juices and butter.
- The Basting Ritual: Now, generously spoon or brush the lemon parsley butter over the exposed meat. Close the lid of the grill and let them cook for another 5-8 minutes. Baste them once or twice more during this time. The closed lid creates an oven-like environment, ensuring the lobster cooks through evenly.
- The Doneness Test: This is where many people get nervous, but fear not. Lobster is done when the meat is opaque, firm to the touch, and registers an internal temperature of 140°F (60°C) on an instant-read thermometer inserted into the thickest part. The shells will also turn a vibrant, bright red color.
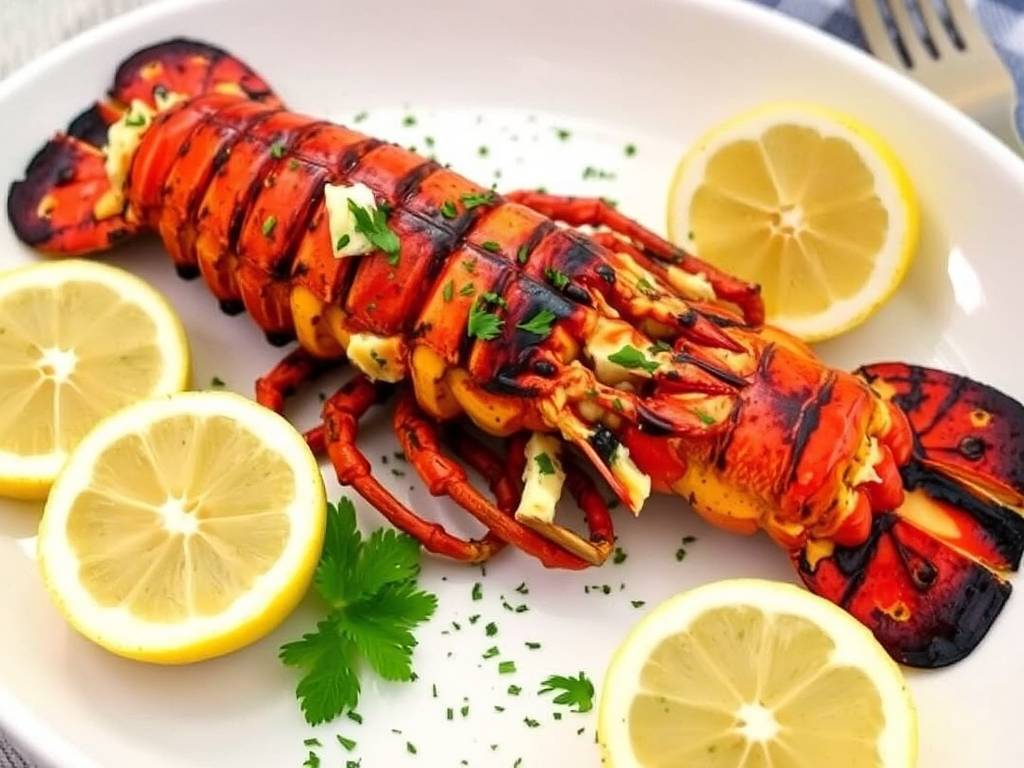
Serving Your Grilled Lemon Parsley Lobster Tails
Presentation is part of the fun. Transfer the grilled lobster tails to a serving platter. Give them one final, lavish drizzle of the remaining lemon parsley butter. Garnish with fresh parsley sprigs and lemon wedges for squeezing over the top at the table.
")
What to serve with your masterpiece? Grilled lobster tails pair beautifully with simple sides that don't compete for attention. Consider grilled asparagus, a fresh arugula salad, creamy risotto, or classic drawn butter for those who want an extra rich dip.
Troubleshooting Common Grilling Mistakes
- Tough, Rubbery Meat: This is almost always a sign of overcooking. Trust the thermometer! 140°F is your magic number.
- Sticking to the Grates: Ensure your grill grates are clean, well-oiled, and properly preheated before you put the lobster on.
- Undercooked Meat: If the meat is still translucent and gelatinous, simply return it to the grill, shell-side down, and continue cooking for another minute or two, checking frequently.
- Flare-Ups: If the butter drips and causes flames, move the tails to a cooler part of the grill temporarily until the flames subside.
Grilling lobster tails with lemon and parsley is a culinary adventure that is well worth taking. It’s a technique that impresses guests and satisfies the cook, proving that with a little knowledge and confidence, you can create restaurant-quality seafood right in your own backyard. So, the next time you're looking for a show-stopping meal, remember this guide, fire up the grill, and get ready to enjoy one of the ocean's greatest gifts, prepared to absolute perfection.
发表评论